Getting started: basic Isabelle/jEdit tricks
[jEdit Isabelle newbies As mentioned last time, proof assistants can be daunting, and it’s not just about how to prove theorems. It’s about being aware of all the bells and whistles provided to help you prove theorems. The first modern proof assistant, Edinburgh LCF, provided nothing but a top-level to the ML programming language, designed specifically to the Meta Language for proving theorems. It was a bare-bones environment, but at least it was Turing complete! Nowadays, things work differently. This post is mainly for beginners, but experienced users might learn something too.
Isabelle/jEdit fundamentals
Nothing says daunting like the Isabelle/jEdit reference manual. Everything you want is there, I suppose. More useful to a beginner is the brief tutorial by Christian Sternagel. Let me summarise his main points even more briefly:
- Isabelle/jEdit looks like a text editor, but Isabelle is processing your text the entire time.
- Each and every symbol you can see has been digested by the Isabelle process,
- By hovering/clicking you can interrogate symbols for their types and definitions.
- The whole document is processed in parallel, so the last proof can be fully processed while some earlier parts are still running.
This last point can be puzzling if you watch the progress bar on the right and follow the processing of your theory: how does it reach the bottom when there are red blobs (inducating errors) and purple blobs (indicating a proof still running)? You need to watch out for this sort of thing:
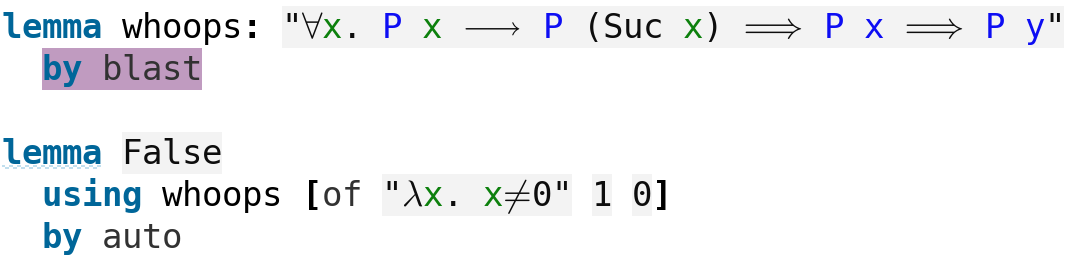
What’s going on? The first lemma, whoops, is actually false but the supplied proof fails to terminate. Isabelle assumes that the proof will succeed eventually, so it continues on and proves False. This strange phenomenon can only happen in interactive mode: the corresponding batch job will run forever. Unfortunately, a student once submitted work containing this error; it was almost entirely incorrect and he had no idea.
More beginner’s points:
- When typing text, jEdit will flag errors in your partially-entered text. Ignore and keep going.
- Text containing syntactic or type errors is skipped over. Since it can’t be interpreted, “live” highlighting is not avaiable.
- Syntax errors can either be inside formulas (“inner syntax”) or in Isar elements themselves (“outer syntax”).
Watch those colours
Some colours will be obvious to you: purple, as above, for a running proof method, and red for syntax errors. Other uses of colour are subtler, but still important. Look carefully at the penultimate line below:
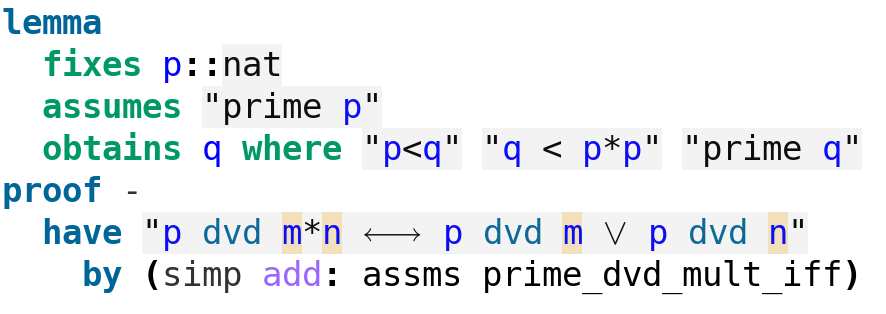
The variables m and n are shaded. That’s because they aren’t fixed in the lemma statement (either explicitly by fixes or implicitly by being mentioned). Neither are they declared locally in the have line (using for). So although the little fact has been proved, it just refers to some particular m and n that we know nothing about. It’s good for nothing.
Surely we wanted to prove this fact for all m and n. One way is to make them bound variables. They are rendered in green, while free variables are blue.

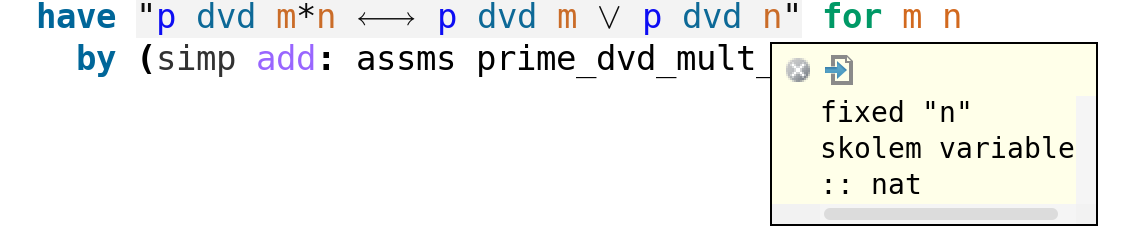
Another way to make m and n universal is via for. Then they are regarded internally as Skolem variables and rendered in orange:

If you find yourself working with two versions of a variable, say a free x and a Skolem x, you are in trouble. This can happen in induction proofs that bring the assumptions of the desired theorem into the induction hypotheses.
One last point about colours. We prefer structured proofs, such as you can see in previous posts. If you use “improper commands” such as apply, they’ll be highlighted in red. There are a couple of instances in the proofs for Wetzel’s problem. It’s basically guilt-tripping.
Deep inspecting of your text
You can inspect variables, constants and other elements by holding down CTRL (CMD for Mac users) and then moving the mouse to hover over them. You’ll be offered popups, such as this:
You can hover over any symbol and get a description; you can even hover over symbols in the popups themselves, getting another popup!
Finally, having hovered over a symbol, you can click to be taken to its definition.
Here is the definition of the operator dvd:

If you hover-click over a theorem name, you get taken to its proof. The text is coloured pink to indicate that it’s frozen: this definition was compiled into the Isabelle/HOL image and therefore cannot be modified.
Sometimes a theory file opens with errors. To jump to them quickly, try these shortcuts:
- skip to next error: SHIFT-C-N
- skip to prev error: SHIFT-C-P
Sadly, you can’t skip to proof steps that are taking forever. That doesn’t count as an error.
Advanced editing features
You can rename a bound or Skolem variable instantly. Simply select it, then press SHIFT-C-RETURN. All visible occurrences of the variable are selected. Then type the new name.
Check out the Edit menu for tonnes of cool things, e.g.
- select code block: type C-8 to select the smallest bracketed expression enclosing a symbol
- indent lines: performs “proper” Isabelle indentation on the selected block of text
Finally, try some of jEdit’s general text editing features. Search/replace handles regular expressions, and HyperSearch allows you to search entire files or directories. Abbreviations make it easy to type long, formulaic commands by defining your own brief key sequences.
Have fun! Go slowly at first, watching for everything that’s going on.